amazing!!!

哀吾生之须臾,羡长江之无穷

这篇按本仓库的做法,说明怎样把一个停在旧 Hexo 上的 GitHub Pages 博客升到当前能构建的版本,并用一次 GitHub Actions 构建同时发布到 GitHub Pages 和一台 VPS 的静态目录。

想先看这件事的经过,可以读 从沉睡到双端发布。做完之后,同一份站点在这两个地址上:

下面的分支名、目录和 secret 名都是本仓库的。你的 Pages 分支如果叫 gh-pages,把文中的 master 换成你的发布分支,两处保持一致即可。

开始之前

先确认这几样东西已经在:

  1. 源码分支和发布分支是分开的。 文章、_config.yml、主题配置写在源码分支。本仓库源码分支叫 hexo。GitHub Pages 读的是另一条只放静态文件的分支,本仓库是 master(有的仓库用 gh-pages)。不要把 hexo 设成 Pages 的发布分支,否则 Pages 会去渲染 Markdown 源码。
  2. 本机能装上当前的 Node。 Hexo 8 要求 Node >= 20.19.0。本仓库把版本写在 .nvmrc,目前是 26.10.0。
  3. 有一台 Linux VPS,并且能 SSH 上去。 上面跑 Caddy 或 nginx,把某个目录当成网站根。本仓库这个目录是 /var/www/blog。服务器上要有 OpenSSH 和 rsync,不需要安装 Hexo 或 Node。
  4. 网站根目录只放这次要发布的静态文件。 后面的同步带 --delete,目录里多出来的文件会被删掉。

升级构建链

旧环境常见的组合是 Node 12、Hexo 3、NexT 5。这套在现在的系统上往往装不上,也和当前的 GitHub Actions 镜像对不齐。升级时让本机和 CI 读同一份版本说明。

把 Node 写进 .nvmrc

.nvmrc 里只放一行版本号,例如 26.10.0。本机:

1
2
3
nvm install
nvm use
node -v

package.json 的 engines.node 写成 >=20.19.0,避免有人用过旧的 Node 跑 npm ci。Actions 里用 actions/setup-node,并设置 node-version-file: .nvmrc,这样 CI 和本机读的是同一个文件。

Hexo 8,主题改走 npm

依赖按本仓库锁定的版本安装:

包 版本
hexo 8.1.2
hexo-theme-next 8.29.0
hexo-deployer-git 4.0.0

主题用 npm 包,不再用 themes/next 这种 git 子模块。旧子模块指着 2017 年的 NexT 5.1.0,这个仓库里还曾经没有 .gitmodules,克隆之后主题目录并不可靠。

hexo-theme-next 注册出来的主题名仍是 next,所以 _config.yml 里继续写:

1
theme: next

站点自己的外观放在仓库根目录的 _config.next.yml。Hexo 会用它覆盖 node_modules/hexo-theme-next 里的默认值。要改配色、菜单、页脚,改这份文件。不要改 node_modules 里的主题源码,下次 npm ci 会盖掉。

本仓库在 _config.next.yml 里保留了原来的 Pisces 方案,并关掉了 NexT 8 默认打开的暗色模式。你的站点按自己的外观写,和发布流程无关。

地址、语言、固定链接、发布分支

这几项写在 _config.yml,升级时逐项核对,不要顺手“整理”旧路径。

1
2
3
4
5
6
7
8
9
url: https://alwaysloseall.github.io
root: /
permalink: :year/:month/:day/:title/
language: zh-CN

deploy:
type: git
repo: https://github.com/alwaysloseall/alwaysloseall.github.io.git
branch: master

为什么要改 language:NexT 8 的简体语言文件是 zh-CN.yml。旧配置里常见的 zh-Hans 对不上这份文件,菜单会落到主题的默认语言。

为什么固定链接不动::title 取的是文章文件名。旧文章路径里有中文和空格,和 2018 年线上一致。改成英文 slug、:name 或 :id,原来的外链会 404。升级后先对比 public/ 里的文章路径,再允许发布。

deploy.branch 必须和后面 Actions 的 publish_branch 相同。本机的 npx hexo deploy 只按这一段把 public/ force push 到该分支,不会同步 VPS。双端发布以 Actions 为准。

本地生成一次

1
2
3
npm ci
npx hexo clean
npx hexo generate

看两样东西:

  • public/index.html 存在且不是空文件
  • 每篇文章仍在 public/年/月/日/标题/index.html

npx hexo server 可以在 http://localhost:4000 看页面。public/ 已在 .gitignore 里,不要提交。

有的旧文章在 front matter 里把 layout 写成了主题不存在的名字。NexT 8 没有对应模板时,那一篇生成会出问题。本仓库有两篇写成了 nodejs 和 typescript,scripts/fix-legacy-layouts.js 在生成前把它们按 post 渲染,不改原文。你的站点如果没有这种历史字段,不必加这个脚本。

一次构建,两个出口

工作流文件是 .github/workflows/deploy.yml,名称 Deploy。两种情况会启动它:向 hexo push,或在 Actions 页面手动 Run workflow(workflow_dispatch)。

真正往 master 和服务器写文件,还要求 github.ref == 'refs/heads/hexo'。因此只有对源码分支的 push,以及在 hexo 上手动 Run workflow,会发布。从别的分支手动运行时,build 仍会生成,两个发布 job 会被跳过。尚未合并的 Pull Request 不会触发这条工作流;合并进 hexo 时的那次 push 才会。

三个 job 的关系如下。名字和仓库里的一致:

1
2
3
4
5
6
7
8
9
10
11
12
13
14
15
16
17
18
19
20
21
22
23
24
25
26
27
28
29
30
31
32
33
34
35
36
37
name: Deploy

on:
push:
branches:
- hexo
workflow_dispatch:

concurrency:
group: dual-deploy
cancel-in-progress: false

jobs:
build:
# setup-node 读取 .nvmrc,cache: npm
# npm ci
# npx hexo clean && npx hexo generate
# 检查 public/index.html 和按年月日分目录的文章页
# actions/upload-artifact,名称 site,保留 14 天

deploy-pages:
needs: build
if: github.ref == 'refs/heads/hexo'
# 下载 site 到 public/
# peaceiris/actions-gh-pages@v4
# github_token: ${{ secrets.GITHUB_TOKEN }}
# publish_dir: ./public
# publish_branch: master
# force_orphan: true
# enable_jekyll: false

deploy-nekodayo:
needs: build
if: github.ref == 'refs/heads/hexo'
# 下载同一份 site 到 public/
# bash .github/scripts/deploy-nekodayo.sh
# rsync -az --delete 到用户@主机:/var/www/blog

deploy-pages 和 deploy-nekodayo 都只 needs: build,彼此不依赖。一次构建上传一份名为 site 的 artifact,两个发布 job 各下载这一份,避免各生成一次后内容对不上。

cancel-in-progress: false 是故意的:新的 push 不会取消已经在跑的发布,免得 rsync 或推分支停在半截。

GitHub Pages

deploy-pages 使用 peaceiris/actions-gh-pages。github_token 用 Actions 自带的 secrets.GITHUB_TOKEN,不用再为 Pages 建一个 secret。

force_orphan: true 让 master 每次只剩「最新站点」这一个提交,历史留在 hexo。enable_jekyll: false 会在站点根放 .nojekyll,GitHub Pages 不会再用 Jekyll 处理这个目录。

这个 job 声明了 contents: write。若推送报没有写权限,到 Settings → Actions → General → Workflow permissions,选择 Read and write permissions。master 如果禁止 force push,orphan 推送也会失败,需要允许 GitHub Actions 向这条分支 force push。

master 上如果曾经手工放过 CNAME,下次 orphan 发布会盖掉。自定义域名文件要放进会进入 public/ 的源码里,而不是只放在发布分支上。

VPS

deploy-nekodayo 不在服务器上跑 Hexo。它下载 public/,用仓库里的 .github/scripts/deploy-nekodayo.sh 经 SSH 执行:

1
rsync -az --delete public/ 用户@主机:/var/www/blog/

脚本里的目标路径写死为 /var/www/blog。主机和用户有默认值,也可以用 secret 覆盖(见下一节)。同步结束后会在服务器上检查 /var/www/blog/index.html 非空。

--delete 的范围只是这个网站根目录:本次 public/ 里没有的文件,会从 /var/www/blog 删掉。hexo 分支上的 Markdown 不在这台机器上,不会被 rsync 碰到。

Caddy 或 nginx 只要把站点根指到这个目录。Web 服务器配置不在这条工作流里,升级 Hexo 时不用改它,除非你同时换了目录。

配 Actions secrets

路径:Settings → Secrets and variables → Actions → New repository secret。Secret 属于仓库,不随分支变化。希望第一次推到 hexo 时服务器也成功,就先把密钥加好,再合并工作流。

用一把只给这个博客部署的密钥,不要复用你平时登录服务器或 GitHub 的私钥。不要设口令,Actions 不能在中途输入 passphrase。私钥不要提交进仓库。

1
ssh-keygen -t ed25519 -C "github-actions-blog-deploy" -f nekodayo_deploy -N ""

把 nekodayo_deploy.pub 追加到服务器上对应用户的 authorized_keys。本仓库默认用户是 root,文件是 /root/.ssh/authorized_keys。若你把 NEKODAYO_USER 改成别的用户,公钥就要进那个用户的 authorized_keys,并且该用户对 /var/www/blog 有写权限。

Secret 放什么
NEKODAYO_SSH_KEY 必填。nekodayo_deploy 私钥全文(OpenSSH 格式,保留换行)
NEKODAYO_KNOWN_HOSTS 建议。ssh-keyscan 的输出,用来固定主机密钥
NEKODAYO_HOST 可选。默认 nekodayo.com
NEKODAYO_USER 可选。默认 root

在仓库目录里写入(私钥路径按你上一步的文件名):

1
2
gh secret set NEKODAYO_SSH_KEY < nekodayo_deploy
gh secret set NEKODAYO_KNOWN_HOSTS < <(ssh-keyscan -t ed25519,ecdsa,rsa nekodayo.com)

gh secret set 会保留换行。写完后私钥文件留在本机或删掉。

NEKODAYO_KNOWN_HOSTS 保存之前,先对主机指纹。本机:

1
ssh-keyscan -t ed25519 nekodayo.com | ssh-keygen -lf -

在服务器上:

1
ssh-keygen -lf /etc/ssh/ssh_host_ed25519_key.pub

两边一致再写入 secret。这个 secret 空着时,脚本会当场 ssh-keyscan 并信任当次返回的密钥。那是首次信任:当次连接若被劫持,记下来的会是别人的主机密钥。配好 NEKODAYO_KNOWN_HOSTS 之后,脚本使用 StrictHostKeyChecking=yes,不再扫描。

服务器上还没有 rsync 时,deploy-nekodayo 会失败并提示安装。装好后重跑该 job 即可。

生成结果不像站点时,不要发布

build 在上传 artifact 之前做检查,核心是:

1
2
test -s public/index.html
find public -mindepth 3 -path 'public/20*/*/*/index.html' -print -quit

index.html 缺失或为空,或者找不到 public/20xx/月/日/.../index.html 这种文章页,这一步会失败退出。deploy-pages 和 deploy-nekodayo 都依赖 build,所以两处都不会被覆盖。

这个查找方式和本仓库的固定链接绑在一起::year/:month/:day/:title/。如果你改了 permalink,要同时改工作流里的 find,否则正常站点也会被当成空站拦下。

服务器失败时,Pages 仍然可以成功

两个发布 job 互不等待。NEKODAYO_SSH_KEY 没配、SSH 登录失败、主机密钥对不上、服务器没有 rsync,都只会让 deploy-nekodayo 失败。deploy-pages 仍会把同一份 artifact 推到 master。

整次 workflow 会显示失败,因为服务器没有同步上。打开该次运行,看 deploy-pages 自己的结论。site 这个 artifact 保留 14 天,密钥或服务器补好之后可以只重跑 deploy-nekodayo,也可以再推一次 hexo,或手动 Run workflow。

平时怎么发一篇

改动都发生在源码分支:新文章放 source/_posts/,日期写在 front matter 里。然后任选一种方式触发 Deploy:

  1. 直接 push 到 hexo
  2. 开 Pull Request,合并进 hexo(合并会产生一次指向 hexo 的 push)
  3. 在 Actions 里对工作流 Deploy 选 Run workflow,分支选 hexo

发之前在本机跑一次 npx hexo generate,确认新文章出现在 public/年/月/日/标题/,旧文章的路径没有变。本机的 npx hexo deploy 只会更新 master,要让 VPS 一起更新,用上面三种里的一种。


这个博客从 2018 年 11 月左右就停更了。主题还是当年的 NexT 5,文章倒没丢,停的时候大概十三篇,源码和线上也能对上。只是构建环境停在那年,我自己再打开都有点发怵。

今年想给它一个自己的域名:blog.nekodayo.com。alwaysloseall.github.io 用了很多年,以前的链接还指着那儿,所以 GitHub Pages 留着。两个地址看的是同一份站点。

仓库里,文章和配置写在源码那条分支上;GitHub Pages 用的是生成出来的静态页面。自己的域名也只放静态文件,服务器上并不跑 Hexo。

架子换了一代:Hexo 到 8,主题到 NexT 8,Node 换成现在还能用来构建的版本。外观还是原来那套浅色版式。旧文章的地址没改,以前的链接应该还能打开。

发布是一次构建、两个出口。源码推上去之后,GitHub Actions 会生成一次站点,同时更新 GitHub Pages 和 blog.nekodayo.com。之后写新文章也一样:改源码,推上去,两个站一起变。

现在两边都能打开:

久了没更新blog,算下来也有一年多了,这一年作为一个重度依赖React前端工作者,想对自己工作有所总结。所以呢,这一篇文章就用于总结一些 TypeScript with React 的经验吧。

项目架构

自从 UmiJS 发布以来,我在公司及个人项目中得到很好的应用。所以这里分享的也是基于此框架建立的解决方案。
基本的目录结构:

1
2
3
4
5
6
7
8
9
10
11
12
13
14
15
16
17
18
19
20
umi version: 1.x
+ dist // 生产环境构建产物
+ mock // mock 文件所在目录,基于 express
+ node_modules // 依赖库
+ src
+ assets // 资源目录
+ components // 组件
+ layouts // 布局组件
-index.tsx // 全局布局
+ models // dva models
+ pages // router page
+ services // 通信services
+ utils // 工具函数
- global.ts // 可以在这里加入 polyfill
- global.less // 约定的全局样式文件,自动引入
- .umirc.js
- .webpackrc.js
- package.json
- tsconfig.json
- typings.d.ts

文件分析

tsconfig.json

ts的配置文件

1
2
3
4
5
6
7
8
9
10
11
12
13
14
15
16
17
18
19
{
"compilerOptions": {
"target": "es6",
"module": "es6",
"moduleResolution": "node",
"jsx": "react",
"baseUrl": ".",
"paths": {
"src": ["src"],
"services/*": ["src/services/*"],
"components/*": ["src/components/*"],
"assets/*": ["src/assets/*"],
"utils/*": ["src/utils/*"]
},
"allowSyntheticDefaultImports": true,
"experimentalDecorators": true
}
}

typings.d.ts

1
2
3
4
5
6
7
8
9
10
11
12
13
14
15
16
17
18
19
20
21
22
23
24
25
declare module "*.css";

declare module "*.less";

declare module "*.png";

declare module "*.gif";

declare module "BMap"; // BMap

declare module "BMapLib"; // BMapLib

interface Window { // umi允许通过window.g_app 访问store
g_app: {
_store: {
dispatch: Function,
getState: Function
}
}
}

interface Array<T> { // 使用中发现这个函数会报错???
includes: (item: T) => boolean
}

编写一个标准的React Component

1
2
3
4
5
6
7
+ MyComponent
+ __snapshots__ // 测试快照
- index.react.test.tsx.snap // 快照文件
- index.tsx
- index.less // 组件样式,采用的css module
- index.react.test.tsx // jest test
- PropsType.ts

PropsType.ts

1
2
3
4
5
6
7
8
9
10
11
12
interface PropsType {
style?: React.CSSProperties, // 父容器style
headstyle?: React.CSSProperties, // 头部样式
titleTextstyle?: React.CSSProperties, // 标题文字样式
iconImg?: string, // 图标图片
color?: string,
title?: string,
children?: React.ReactNode,
right?: React.ReactNode, // 右侧内容
}

export default PropsType;

index.tsx

1
2
3
4
5
6
7
8
9
10
11
12
13
14
15
16
17
18
19
20
21
22
23
24
25
26
27
28
29
30
31
32
33
34
35
36
37
import React from 'react';
import styles from "./index.less";

import PropsType from "./PropsType";

export default ({ style, headstyle, titleTextstyle, iconImg, color, title, children, right }: PropsType) => {
return (
<div className={styles.container} style={style}>
<div className={styles.head} style={headstyle}>
{
title ?
<div className={styles.title}>
{
iconImg ?
<img
className={styles.iconImg}
src={iconImg}
/>
:
<span className={styles.icon} style={{ backgroundColor: color || "#2f81f8" }}>
</span>
}
<span className={styles.titleText} style={titleTextstyle}>{title}</span>
</div>
:
<div></div>
}
<div className={styles.right}>
{right}
</div>
</div>
<div className={styles.content}>
{children}
</div>
</div>
);
}

index.react.test.tsx

1
2
3
4
5
6
7
8
9
10
11
12
13
14
15
16
17
18
19
20
import React from "react";
import CustomIconList from "./index";
import renderer from "react-test-renderer";

test("CustomIconList render", () => {
const component = renderer.create(
<CustomIconList
style={{ height: 200 }}
headstyle={{ backgroundColor: "#0f0" }}
iconImg="icon-test"
color="#f00"
title="test title"
titleTextstyle={{ fontSize: 12 }}
right={<span>test right</span>}
>
<span>test children</span>
</CustomIconList>
).toJSON();
expect(component).toMatchSnapshot();
});

页面基类的定义

1
2
3
4
5
6
7
8
9
10
11
12
13
14
15
16
17
18
19
20
21
22
23
24
25
26
27
28
29
30
31
32
33
34
35
36
37
38
39
40
41
42
43
44
45
46
47
48
49
50
51
52
53
54
55
import React, { Component } from "react";
import router from 'umi/router';
import qs from "qs";
import moment from 'moment';

import { RouteComponentProps } from 'react-router';
import { FormComponentProps } from 'antd/lib/form';
import { DispatchProp } from 'react-redux';

interface PageComponentInterface<P = {}, S = {}, SS = any> extends Component<P, S, SS> {

}

interface PropsType extends RouteComponentProps<any>, FormComponentProps, DispatchProp<any>{

}

export default class PageComponent<P extends PropsType, S> extends Component<P, S> implements PageComponentInterface<P, S> {

public searchParams = qs.parse(this.props.location.search, { ignoreQueryPrefix: true });

goBackHandle = () => {
router.goBack();
};

searchResetHandle = () => {
this.props.form.resetFields();
router.push(`?`);
};

searchBtnHandle = (e: React.MouseEvent) => {
e.preventDefault();
this.props.form.validateFields((error, values: Object) => {
if (!error) {
Object.keys(values).forEach(key => {
if (moment.isMoment(values[key])) {
values[key] = (values[key] as moment.Moment).valueOf();
}
});
router.push(`?${qs.stringify({
...values,
})}`);
}
});
};

handlePaginationChange = (page, pageSize) => {
const oldParams = qs.parse(this.props.location.search, { ignoreQueryPrefix: true });
const newParams = { ...oldParams, pageIndex: page, pageSize: pageSize };
if (oldParams.pageSize && oldParams.pageSize != pageSize) {
newParams.pageIndex = 1;
}
router.push(`?${qs.stringify(newParams)}`);
};
}

使用方法:

1
2
3
4
5
6
7
8
9
10
11
import {connect} from 'dva';
import React from "react";

@connect(({ tradePlan, loading }) => ({
list: tradePlan.list,
pagination: tradePlan.pagination,
loading: loading.effects['tradePlan/queryList']
}))
class Index extends PageComponent<PropsType, StateType> {

}

实例上就会挂载基类上的方法

工具类的应用

validator.ts

1
2
3
4
5
6
7
8
9
10
11
12
13
14
15
16
17
18
19
20
21
22
23
24
25
26
27
28
29
interface NumberRegClass {

}

interface NumberRegConstructorOptions {
positive: boolean //正数
}

export class NumberReg extends RegExp implements NumberRegClass {

/**
* @param {number} int 整数位
* @param {number} decimals 小数位
* @param {NumberRegConstructorOptions} options? 参数
*/
constructor(int: number, decimals: number, options?: NumberRegConstructorOptions) {
const { positive = false } = options || {};
super(`^(${positive ? '' : '\\-?'})([1-9]\\d{0,${int - 1}}|0)${decimals ? `(\\.\\d{0,${decimals - 1}}[1-9])` : ''}?$`);
}

/**
* 验证bit位的整数
* @param {number} bit 整数位数
* @returns RegExp
*/
static int(bit: number): RegExp { //整数
return new RegExp(`^(\\-?[1-9]\\d{0,${bit - 1}}|0)$`);
}
}

validator.test.ts

1
2
3
4
5
6
7
8
9
10
11
12
13
14
15
import { NumberReg } from './validator';

/// <reference types="jest" />

test('NumberReg test', () => { // 数字正则
const number5and4 = new NumberReg(5, 4);
expect(number5and4.test('12345.1234')).toBe(true);
expect(number5and4.test('-12345.1234')).toBe(true);
expect(number5and4.test('0.1234')).toBe(true);
expect(number5and4.test('-0.1234')).toBe(true);
expect(number5and4.test('12345.12345')).toBe(false);
expect(number5and4.test('12345.120')).toBe(false);
expect(number5and4.test('123456.12')).toBe(false);
expect(number5and4.test('-123456.12')).toBe(false);
});

总结

以上,是部分运用在TypeScript with React的小结而已,感觉通篇的代码也贴得太多了。(然而还有很多不知道怎么描述。
总之,就是让可复用的组件能够独立的进行编写,测试。
为所有的工具类函数提供unit test,才能更完善的服务于业务。

nodejs自身v8的addon可以通过c++实现高效的拓展功能

下面将通过js调用addon输出Hello,World

  • node -v: 8.4.0
  • npm -v: 5.3.0
    较低版本的node好像会有问题,之前用7.*好像不行(逃

首先安装node-gyp,在工程根目录创建binding.gyp

npm install node-gyp -g

1
2
3
4
5
6
7
8
9
binding.gyp
{
"targets": [
{
"target_name": "hello",
"sources": ["native\hello.cc"]
}
]
}

创建native目录并在其中创建.cc文件:

1
2
3
4
5
6
7
8
9
10
11
12
13
14
hello.cc
#include <node.h>
#include <v8.h>
void Method(const v8::FunctionCallbackInfo<v8::Value>& args)
{
v8::Isolate* isolate = args.GetIsolate();
v8::HandleScope scope(isolate);
args.GetReturnValue().Set(
v8::String::NewFromUtf8(isolate, "Hello,World"));
}
void init(v8::Local<v8::Object> exports) {
NODE_SET_METHOD(exports, "hello", Method);
}
NODE_MODULE(hello, init); //arg0与target_name一致

在工程根目录下 node-gyp configure 后会生相应的vs工程在build中,然后在vs中Release

在生成后,写js去调用:

1
2
var hello = require('./build/Release/hello.node').hello();
console.log(hello);

输出结果:
图片

最近开了个新坑,其实并不是开坑(逃—兴趣使然,所以想看一下underscore.js的源码,所以俺跟着@hanzichi的解读文章一起了解咯
解读文章地址

关于void运算符,参考自MDN

先放相关地址
MDN对void运算符的解释如下:

The void operator evaluates the given expression and then returns undefined.

就是说 void 运算符 对给定的表达式进行求值,然后返回 undefined。就是说void后面不管跟什么,最后都会返回一个undefined,比如 void 0, void(0), void(1+1) 等等。
在以前的使用中俺只在处理a标签默认事件,当然现在在MDN上查到了更多用法辣

立即调用的函数表达式

在使用立即执行的函数表达式时,可以利用 void 运算符让 JavaScript 引擎把一个函数识别成函数表达式而不是函数声明(语句)。

1
2
3
4
5
6
7
8
9
10
11
12
void function iife() {
var bar = function () {};
var baz = function () {};
var foo = function () {
bar();
baz();
};
var biz = function () {};

foo();
biz();
}();

JavaScript URIs

当用户点击一个以 javascript: URI 时,浏览器会对冒号后面的代码进行求值,然后把求值的结果显示在页面上,这时页面基本上是一大片空白,这通常不是我们想要的。只有当这段代码的求值结果是 undefined 的时候,浏览器才不会去做这件傻事,所以我们经常会用 void 运算符来实现这个需求。像下面这样:

1
2
3
4
5
6
7
8
<a href="javascript:void(0);">
这个链接点击之后不会做任何事情,如果去掉 void(),
点击之后整个页面会被替换成一个字符 0。
</a>
<p> chrome中即使<a href="javascript:0;">也没变化,firefox中会变成一个字符串0 </p>
<a href="javascript:void(document.body.style.backgroundColor='green');">
点击这个链接会让页面背景变成绿色。
</a>

为什么用「void 0」代替「undefined」

在underscore的源码中,没有出现undefined,而用 void 0 代替之,之所以要这么处理是因为undefined在一些情况下可能会被重写,下面列出这几种情况

  1. undefined 并不是保留词(reserved word),它只是全局对象的一个属性,在低版本 IE 中能被重写。
1
2
3
4
5
var undefined = 10;

// undefined -- chrome
// 10 -- IE 8
alert(undefined);
  1. undefined 在 ES5 中已经是全局对象的一个只读(read-only)属性了,它不能被重写。但是在局部作用域中,还是可以被重写的
1
2
3
4
5
6
7
8
9
10
11
12
13
(function() {
var undefined = 10;

// 10 -- chrome
alert(undefined);
})();

(function() {
undefined = 10;

// undefined -- chrome
alert(undefined);
})();

在进行一些值判断的时候就可以用 void 0 了:

1
2
3
4
var a = [];

// true
a === void 0;

所以综上所述,用「void 0」代替「undefined」是一个正确的选择,而且还可以节省代码空间,事实上,不少 JavaScript 压缩工具在压缩过程中,正是将 undefined 用 void 0 代替掉了。

react-native android打包

之前用create-react-native-app创建的应用在打包方面不是很实用,要通过expo打包,所以之后我使用了官方推荐的react-native-cli来创建应用

搭建开发环境

这一点在文档上已经很清晰了
中文:https://reactnative.cn/docs/0.46/getting-started.html
原文:https://facebook.github.io/react-native/docs/getting-started.html
需要注意的是这里都没有说明在react-native run-android的时候需要启动虚拟机,需要自己在android里面手动启动

打包应用

我把之前做的B/S应用改成了R-N应用,首页上采用了R-N的模块,内页使用了WebView以重用之前的代码

生成签名密钥

打包android应用需要生成一个签名密钥

keytool -genkey -v -keystore my-release-key.keystore -alias my-key-alias -keyalg RSA -keysize 2048 -validity 10000
这条命令会要求你输入密钥库(keystore)和对应密钥的密码,然后设置一些发行相关的信息。最后它会生成一个叫做my-release-key.keystore的密钥库文件。

设置gradle变量

把my-release-key.keystore文件放到你工程中的android/app文件夹下。
编辑C:\Users\用户名.gradle\gradle.properties(没有这个文件你就创建一个),添加如下的代码(注意把其中的****替换为相应密码)

MYAPP_RELEASE_STORE_FILE=my-release-key.keystore
MYAPP_RELEASE_KEY_ALIAS=my-key-alias
MYAPP_RELEASE_STORE_PASSWORD=*****
MYAPP_RELEASE_KEY_PASSWORD=*****

添加签名到项目的gradle配置文件

编辑你项目目录下的android/app/build.gradle,添加如下的签名配置:

…
android {
…
defaultConfig { … }
signingConfigs {
release {
storeFile file(MYAPP_RELEASE_STORE_FILE)
storePassword MYAPP_RELEASE_STORE_PASSWORD
keyAlias MYAPP_RELEASE_KEY_ALIAS
keyPassword MYAPP_RELEASE_KEY_PASSWORD
}
}
buildTypes {
release {
…
signingConfig signingConfigs.release
}
}
}
…

修改应用名称和图标

编辑项目目录下的:android\app\src\main\res\values\strings.xml

MyProject
MyProject改成你需要的名字就好了。

图标在android\app\src\main\res文件夹下每个mipmap开头的文件夹下有一个不同尺寸的版本,可以自行输出,也可以使用Android Studio批量修改。

生成发行APK包

运行如下命令:

cd android && ./gradlew assembleRelease
生成的APK文件位于android/app/build/outputs/apk/app-release.apk,即可用于发布

启用Proguard代码混淆来缩小APK文件的大小(可选)

Proguard是一个Java字节码混淆压缩工具,它可以移除掉React Native Java(和它的依赖库中)中没有被使用到的部分,最终有效的减少APK的大小。

重要:启用Proguard之后,你必须再次全面地测试你的应用。Proguard有时候需要为你引入的每个原生库做一些额外的配置。参见app/proguard-rules.pro文件。

要启用Proguard,设置minifyEnabled选项为true:

def enableProguardInReleaseBuilds = true

一个应用通常是不会只有一个页面的,所以为了实现多页跳转,要用到导航组件

StackNavigator的使用

做一个两页的demo吧,首先创建两个文件,MainScreen.js 和 ProfileScreen.js
在app.js中import

1
2
3
4
5
6
7
8
import { StackNavigator, } from 'react-navigation';
import MainScreen from './MainScreen.js';
import ProfileScreen from './ProfileScreen.js';

export default App = StackNavigator({
Main: {screen: MainScreen},
Profile: {screen: ProfileScreen},
});

通过StackNavigator注册导航,感觉跟路由很像啊
然后分别在MainScreen.js 和 ProfileScreen.js 渲染视图

1
2
3
4
5
6
7
8
9
10
11
12
13
14
15
16
17
18
19
20
21
22
23
24
25
26
27
28
29
30
31
32
33
34
35
36
37
38
39
40
41
42
43
44
45
46
47
48
49
50
// MainScreen.js:
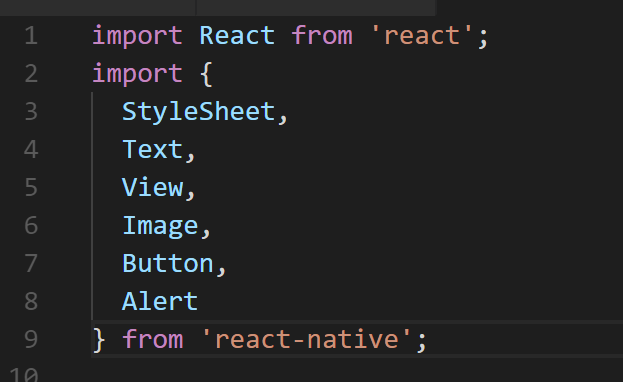
import React from 'react';
import {
StyleSheet,
Text,
View,
Image,
Button,
Alert
} from 'react-native';

export default class MainScreen extends React.Component {
static navigationOptions = {
title: '首页',
};
render() {
const { navigate } = this.props.navigation;
return (
<View style={styles.container}>
<Image
source={ require('./images/laopo.jpg') }
style={styles.laopo}
/>
<Text>上面那个是我老婆</Text>
<Button
title="看更多..."
color="#841584"
onPress={() =>
navigate('Profile')
}
/>
</View>
);
}
}

const styles = StyleSheet.create({
container: {
flex: 1,
backgroundColor: '#fff',
alignItems: 'center',
justifyContent: 'center',
},
laopo: {
width: 450,
height: 500,
left: 40,
top: -80
}
});

可以通过navigate()跳转导航

1
2
3
4
5
6
7
8
9
10
11
12
13
14
15
16
17
18
19
20
21
22
23
24
25
26
27
28
29
30
31
32
33
34
35
36
37
38
39
40
41
42
43
44
45
46
47
48
49
50
// ProfileScreen.js
import React from 'react';
import { StyleSheet, Text, View, ScrollView, Image, Button, NavigatorIOS} from 'react-native';

export default class ProfileScreen extends React.Component {
static navigationOptions = {
title: 'Aimer!!!',
};
render() {
const { navigate } = this.props.navigation;
let content = [];
for (let i = 0; i < myImage.length; i ++) {
content.push(<Image key={i} source={myImage[i]} style={ styles.image }/>);
}
return (
<View style={styles.container}>
{/*<Image source={myImage[0]} style={ styles.image }/>*/}
{ content }
<Button style={ styles.navbar }
title="回首页"
onPress={() =>
navigate('Main')
}
/>
</View>
);
}
}

const myImage = [
require('./images/aimer.jpg'),
require('./images/aimer2.jpg'),
require('./images/aimer_live1.jpg')
]

const styles = StyleSheet.create({
container: {
flex: 1,
backgroundColor: '#fff',
alignItems: 'center',
justifyContent: 'center',
},
navbar: {
top: 500
},
image: {
height: 200,
margin: 10
}
});

效果如图:
图片
首页的图之前发过了,就不发了

(end)

创建好项目之后,现在就可以修改app.js并保存看效果了

一些基本组件的使用

图片
这里列出了几个上手的组件,通过props添加属性,这里以Image举例:

Image

1
2
3
4
<Image 
source={ require('./images/laopo.jpg') }
style={styles.laopo}
/>

source属性可以指定一个图片的地址,可以是一个对象

1
source={{ url: '/image.jpg' }}

也可以用 require() 引入静态资源。

StyleSheet

这里要讲一下style的定义方式,可以直接

1
2
3
4
sytle={{
width: 400,
height: 400
}}

当然更推荐的是在代码内用

1
2
3
4
5
6
7
8
9
10
11
12
13
14
const styles = StyleSheet.create({
container: {
flex: 1,
backgroundColor: '#fff',
alignItems: 'center',
justifyContent: 'center',
},
laopo: {
width: 450,
height: 500,
left: 40,
top: -80
}
});

然后再style属性里如上的方式添加样式,跟css的属性还是比较有出入,这些就去看文档就好啦

Button

1
2
3
4
5
6
7
<Button
title="看更多..."
color="#841584"
onPress={() =>
console.log('button被点击了')
}
/>

onPress是button被按下时的时间,在可点击的组件里都可以注册这个事件

在需要捕捉用户点击操作时,可以使用”Touchable”开头的一系列组件。这些组件通过onPress属性接受一个点击事件的处理函数。当一个点击操作开始并且终止于本组件时(即在本组件上按下手指并且抬起手指时也没有移开到组件外),此函数会被调用。

基本API

这里说几个基本的API吧,最基本的莫过于Alert了

Alert

1
2
3
4
5
6
7
8
9
10
11
12
13
14
15
<Button
title="Click Me!!"
onPress={() => {
Alert.alert(
'标题',
'内容',
[
{text: '嘿嘿嘿', onPress: () => console.log('嘿嘿嘿')},
{text: '取消', onPress: () => console.log('取消'), style: 'cancel'},
{text: '确定', onPress: () => console.log('确定')},
],
{ cancelable: false }
);
}}
/>

这一看就能看懂吧。。。效果如图
图片

AlertIOS

这个是针对IOS用的,启动一个允许用户输入的对话框

1
2
3
4
5
6
7
8
9
10
11
12
13
AlertIOS.prompt(
'标题',
'内容',
[
{text: '嘿嘿嘿', onPress: () => console.log('嘿嘿嘿')},
{text: '取消', onPress: () => console.log('取消'), style: 'cancel'},
{text: '确定', onPress: () => console.log('确定')},
],
(promptData) => {
console.log(promptData)
}
);
/>

(end)

前端圈聊这个react-native也好长一段时间了,以前也写过一段时间react,不是react吹,所以一直没玩这个native,看来我还是naive啊。

Getting Started

我现在用的ios手机,但是我没macOS啊,所以只有用Create React Native App这个工具了,官网是这么说的,反正就是可以直接跑在手机上啦,但是不能用第三方的组件。

Create React Native App is the easiest way to start building a new React Native application. It allows you to start a project without installing or configuring any tools to build native code - no Xcode or Android Studio installation required (see Caveats).

安装

首先安装Create React Native App

1
npm install -g create-react-native-app

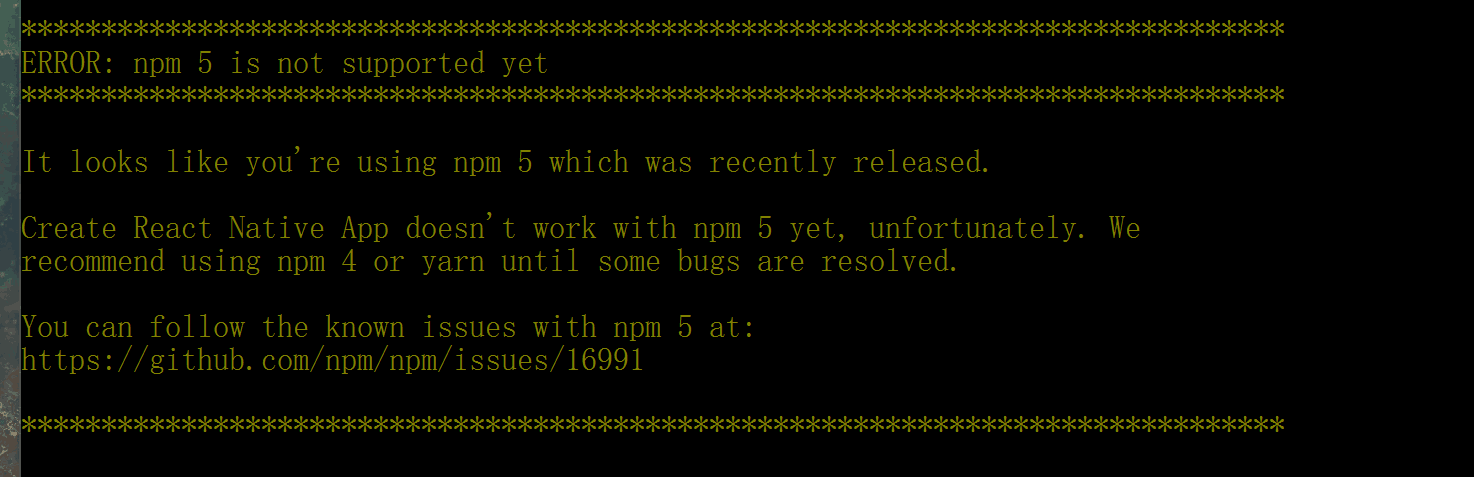
这里要注意npm的版本问题,必需用npm@4.x的版本。
notSupport
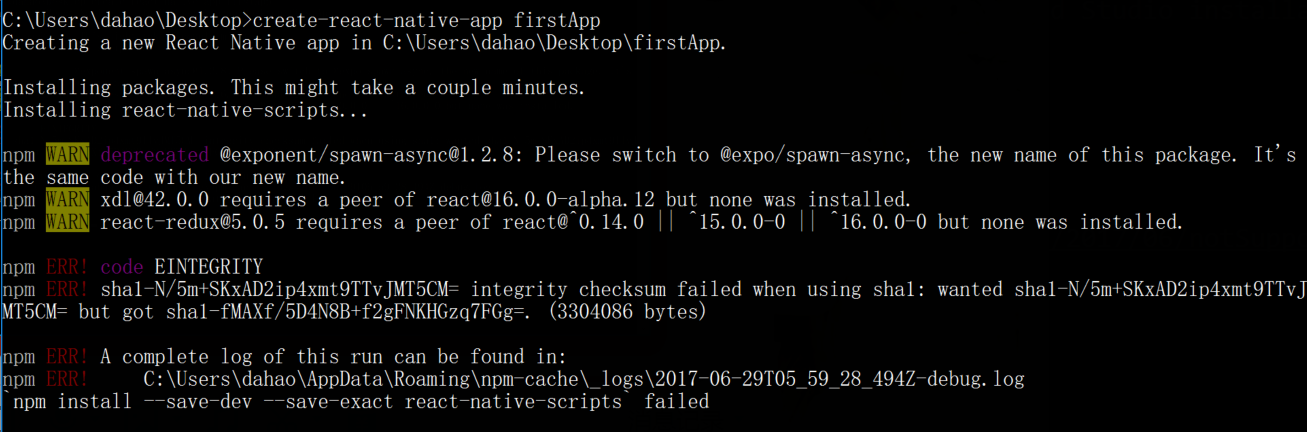
如果遇到这种报错,就需要手动先安装react
needReact

1
npm install -g react

创建&启动

安装好之后就可以创建项目啦,创建后进入项目目录然后执行npm start

1
2
3
create-react-native-app FirstApp
cd FirstApp
npm start

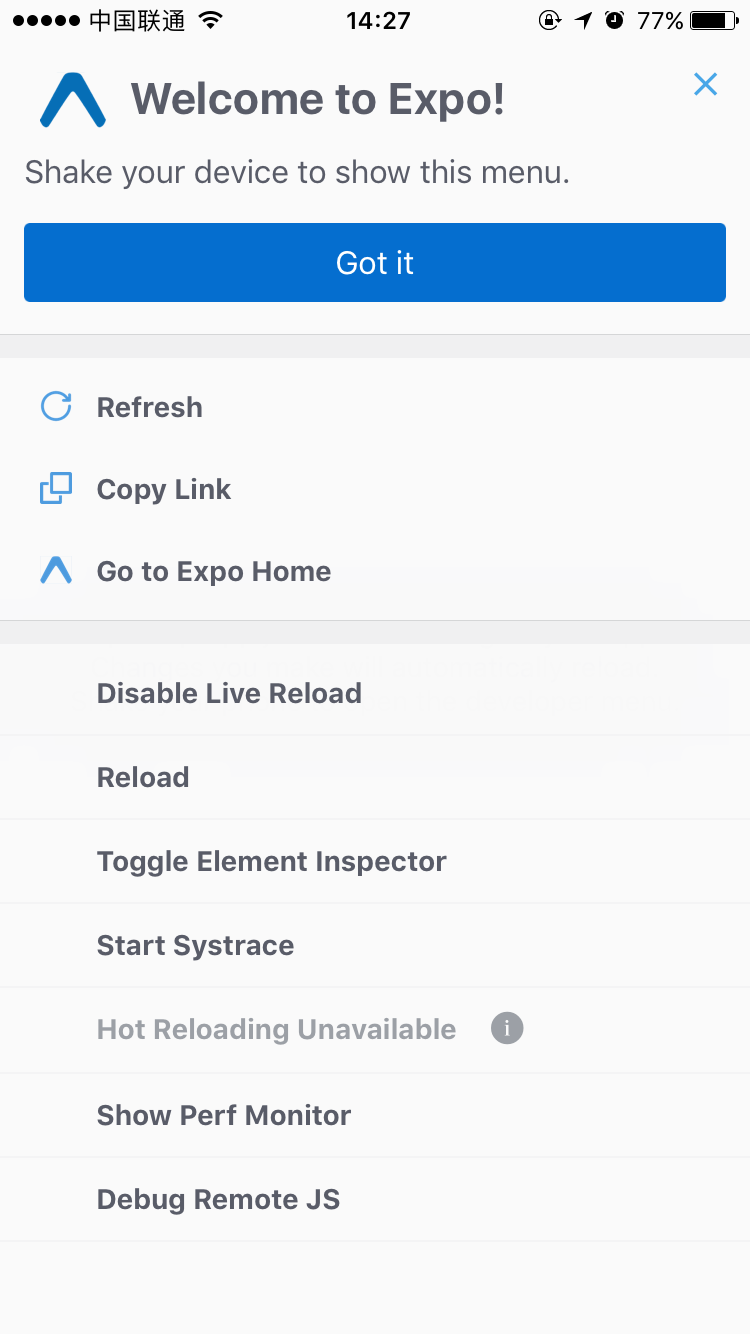
一切就绪之后命令行中就会显示二维码,在appStore里面下载安装Expo扫码就可以预览项目了。
如下:
guide
点击Got it按钮
显示的页面就是项目目录下app.js的内容了,修改app.js并保存,页面会自动刷新。

(end)

收藏到这里,以后用的时候好找;不知道扔什么分类了,参考手册?就其他吧…

命令

1
2
3
4
5
6
7
8
9
10
11
12
13
14
15
16
17
18
19
20
21
22
23
24
25
26
27
28
29
30
31
32
33
34
35
36
37
38
39
40
41
42
43
44
45
46
47
48
49
50
51
52
53
54
55
56
57
58
59
60
61
62
63
64
65
66
67
68
69
70
71
72
73
74
75
76
77
78
79
80
81
82
83
84
85
git init                                                  # 初始化本地git仓库(创建新仓库)
git config --global user.name "xxx" # 配置用户名
git config --global user.email "xxx@xxx.com" # 配置邮件
git config --global color.ui true # git status等命令自动着色
git config --global color.status auto
git config --global color.diff auto
git config --global color.branch auto
git config --global color.interactive auto
git clone git+ssh://git@192.168.53.168/VT.git # clone远程仓库
git status # 查看当前版本状态(是否修改)
git add xyz # 添加xyz文件至index
git add . # 增加当前子目录下所有更改过的文件至index
git commit -m 'xxx' # 提交
git commit --amend -m 'xxx' # 合并上一次提交(用于反复修改)
git commit -am 'xxx' # 将add和commit合为一步
git rm xxx # 删除index中的文件
git rm -r * # 递归删除
git log # 显示提交日志
git log -1 # 显示1行日志 -n为n行
git log -5
git log --stat # 显示提交日志及相关变动文件
git log -p -m
git show dfb02e6e4f2f7b573337763e5c0013802e392818 # 显示某个提交的详细内容
git show dfb02 # 可只用commitid的前几位
git show HEAD # 显示HEAD提交日志
git show HEAD^ # 显示HEAD的父(上一个版本)的提交日志 ^^为上两个版本 ^5为上5个版本
git tag # 显示已存在的tag
git tag -a v2.0 -m 'xxx' # 增加v2.0的tag
git show v2.0 # 显示v2.0的日志及详细内容
git log v2.0 # 显示v2.0的日志
git diff # 显示所有未添加至index的变更
git diff --cached # 显示所有已添加index但还未commit的变更
git diff HEAD^ # 比较与上一个版本的差异
git diff HEAD -- ./lib # 比较与HEAD版本lib目录的差异
git diff origin/master..master # 比较远程分支master上有本地分支master上没有的
git diff origin/master..master --stat # 只显示差异的文件,不显示具体内容
git remote add origin git+ssh://git@192.168.53.168/VT.git # 增加远程定义(用于push/pull/fetch)
git branch # 显示本地分支
git branch --contains 50089 # 显示包含提交50089的分支
git branch -a # 显示所有分支
git branch -r # 显示所有原创分支
git branch --merged # 显示所有已合并到当前分支的分支
git branch --no-merged # 显示所有未合并到当前分支的分支
git branch -m master master_copy # 本地分支改名
git checkout -b master_copy # 从当前分支创建新分支master_copy并检出
git checkout -b master master_copy # 上面的完整版
git checkout features/performance # 检出已存在的features/performance分支
git checkout --track hotfixes/BJVEP933 # 检出远程分支hotfixes/BJVEP933并创建本地跟踪分支
git checkout v2.0 # 检出版本v2.0
git checkout -b devel origin/develop # 从远程分支develop创建新本地分支devel并检出
git checkout -- README # 检出head版本的README文件(可用于修改错误回退)
git merge origin/master # 合并远程master分支至当前分支
git cherry-pick ff44785404a8e # 合并提交ff44785404a8e的修改
git push origin master # 将当前分支push到远程master分支
git push origin :hotfixes/BJVEP933 # 删除远程仓库的hotfixes/BJVEP933分支
git push --tags # 把所有tag推送到远程仓库
git fetch # 获取所有远程分支(不更新本地分支,另需merge)
git fetch --prune # 获取所有原创分支并清除服务器上已删掉的分支
git pull origin master # 获取远程分支master并merge到当前分支
git mv README README2 # 重命名文件README为README2
git reset --hard HEAD # 将当前版本重置为HEAD(通常用于merge失败回退)
git rebase
git branch -d hotfixes/BJVEP933 # 删除分支hotfixes/BJVEP933(本分支修改已合并到其他分支)
git branch -D hotfixes/BJVEP933 # 强制删除分支hotfixes/BJVEP933
git ls-files # 列出git index包含的文件
git show-branch # 图示当前分支历史
git show-branch --all # 图示所有分支历史
git whatchanged # 显示提交历史对应的文件修改
git revert dfb02e6e4f2f7b573337763e5c0013802e392818 # 撤销提交dfb02e6e4f2f7b573337763e5c0013802e392818
git ls-tree HEAD # 内部命令:显示某个git对象
git rev-parse v2.0 # 内部命令:显示某个ref对于的SHA1 HASH
git reflog # 显示所有提交,包括孤立节点
git show HEAD@{5}
git show master@{yesterday} # 显示master分支昨天的状态
git log --pretty=format:'%h %s' --graph # 图示提交日志
git show HEAD~3
git show -s --pretty=raw 2be7fcb476
git stash # 暂存当前修改,将所有至为HEAD状态
git stash list # 查看所有暂存
git stash show -p stash@{0} # 参考第一次暂存
git stash apply stash@{0} # 应用第一次暂存
git grep "delete from" # 文件中搜索文本“delete from”
git grep -e '#define' --and -e SORT_DIRENT
git gc
git fsck

我要放我老婆照片了!!
老婆

0%